Houdini Paint API
Intro
Houdini で議論されている CSS Paint API が Chrome Canary で flag 付きで実装されている。
デモの実装を通して、関連仕様を含めた以下の 4 つのドラフトを解説する。
CSS Paint API
CSS Paint API は、特定の領域に対して任意の描画を行うことができる仕様である。
例えば、これまで border は、仕様に定義されたいくつかの種類の style から選び、無いものは画像で代替するのが基本だった。
CSS Paint API は用意した領域に対し、画像ではなく Canvas API のサブセットを用いてペイントを行うことができる。
今回はデモとして「突然の死」を Paint で書こうと考えた。
_人人人人人人_
>  突然の死  <
 ̄Y^Y^Y^Y^Y ̄
しかし、現時点では strokeText() など、Canvas のテキスト系の API は仕様から落とされている。
これは、各ブラウザでフォントスタックがマルチスレッド対応されていないため、Worklets 内での実行が難しいという理由かららしく、将来の仕様まで先送りされているとのこと。
詳細は以下を参照。
代わりにデモのネタを探していたところ @yoshiko から、
border double で、太さや間隔を自由に設定したい
という丁度いいユースケースをもらったので、これを実現しながら、関連する API の使い方について解説する。
border-image
まずは、border を描画する <div> に対して、描画領域を用意する。
Paint API で実装したペイントは、最終的には border-image-source に対して指定することになる。
そこで、今回は描画領域として border-width と border-image-slice を指定する。
div {
  /* area size for border */
  --border-width: 10;
  border-image-slice: var(--border-width);
  border-width: calc(var(--border-width) * 1px);
}
ここでは <div> の周囲に 10px 分の領域が作られる。
paint()
作成する描画は border-double-custom という名前とし、これを CSS 内で paint() 関数に指定して呼び出す。
paint() の第二引数以降は、処理に渡される引数となるため、今回は以下のように定義した。
paint(border-double-custom, outer-color, outer-width, inner-color, inner-width, margin)また、開発をするに当たって debug フラグを渡せると便利なため、CSS から debug フラグを渡せるようにもしてみる。
例えば
- 外側の線は 3px の orange
- 内側の線は 5px の yellow
- 線の間隔は 1px
- デバッグ ON
として設定する場合は以下のような指定になる。
(フォールバックとして、ネイティブの実装を指定する)
div {
  /* fall back */
  border: double 4px orange;

  /* debug option */
  --debug: true;

  /* area size for border */
  --border-width: 10;
  border-image-slice: var(--border-width);
  border-width: calc(var(--border-width) * 1px);
  border-image-source: paint(border-double-custom, orange, 3px, yellow, 5px, 1px);
}
paintWorklet
Paint を始め Layout や Animation などの処理は、メインスレッドとは別に実行する必要がある。
また、例えば今回のように border を引く対象が多く存在する場合は、複数処理を並行して走らせる必要もある。
こうした用途では、WebWorker などの Worker は用途として合わないため、Houdini ではより限定した API で軽量な実行環境として Worklet という API が定義されている。
Paint API は Worklet の上位に定義された PaintWorklet の中に実際の描画処理を移譲し、メインスレッドからは Worklet への処理の登録のみを行う。
Worklet への登録は、モジュール単位となっているため、今回実装するファイルを border-double-custom.js とした場合、メインからの呼び出しは以下になる。
CSS.paintWorklet.addModule('border-double-custom.js');Worklet はメインスレッドと Global を共有せず、必要な情報はコピーして渡すこととなる。
これは、後述する Arguments か Property を経由して行う。
registerPaint()
実際に border-double-custom を addModule() したファイルの中に実装していく。
大枠は registerPaint() に対して、名前とコールバックを渡すような形になる。
コールバックは、関数ではなく必要なプロパティを実装した class を渡す。
今回実装するのは以下の 2 つだ。
registerPaint('border-double-custom', class {
  static get inputProperties() { }
  static get inputArguments() { }
  paint(ctx, size, styleMap, arguments) { }
})
inputArguments()
まず、CSS で指定した線の色と幅、間隔の値を取得する必要がある。
CSS で渡した値の型がなんであるかを指定するために、inputArguments() に引数の順に型の配列を指定する。
// paint(border-double-custom, orange, 3px, yellow, 5px, 1px);
static get inputArguments() {
  return [
    '<color>',  // orange
    '<length>', // 3px
    '<color>',  // yellow
    '<length>', // 5px
    '<length>', // 1px
  ]
}
ここで指定する型は、CSS Property and Values に定義された Syntax String である。
CSS Properties and Values API Level 1
これによって、CSS で渡された引数が解析される。
CSS で指定した debug フラグは、 このためには、まず Worklet がアクセス可能なプロパティとして CSS Properties and Values API Level 1
これにより、後述する registerProperty()
pain() の引数ではなく、別のプロパティとして取得する。
--debug をメインスレッド側で registerProperty() を用いて登録する。
--debug は true/false を引数に取りたいが、Property Values の定義する Syntax List には <boolean> は無いため、<custom-indent> を利用し、文字列で代替することとした。
CSS.registerProperty({
  name: '--debug',
  syntax: '<custom-ident>',
  inherits: true,
  initialValue: 'false',
});
inputProperties()
registerProperty() で登録された値は、Worklet 側で inputProperties() に、セーフリストとして指定しておくことで、クラス内に取り込むことができる。
static get inputProperties() {
  return [
    '--debug',
  ]
}paint() callback に渡る Property Style Map に値が含まれる。
paint()
paint() には Canvas Context と領域のサイズ、当たっているスタイル、先に解析した引数が渡る。
paint(ctx, size styleMap, arguments) {
  // paint with canvas api
})
Rendering Context
第一引数は 2D のレンダリングコンテキストである。
ここから Canvas の API を呼ぶことで、実際の描画処理を行う。
moveTo(), lineTo(), strokeRect(), fillRect() などといったおなじみの Canvas API が利用可能だ。
しかし、あくまでサブセットであり前述のように strokeText() などフォントスタックがないなど、使えないものもある。
Paint Size
第二引数は描画対象のサイズであり Width, Height を持つ単純なオブジェクトだ。
Style Property Map
前述の inputProperties() で指定したプロパティが含まれた Map が渡される。
今回指定した --debug は、以下のように取得できる。
const DEBUG = styleMap.get('--debug').valueただし、これは指定した型の都合上、文字列の "true" か "false" になっている。
Arguments
前述の inputArguments() で指定した引数が配列で渡ってくる。
各値は、指定した型でパースされた Typed OM の形でアクセス可能だ。
// paint(border-double-custom, orange, 3px, yellow, 5px, 1px);
paint(ctx, size styleMap, arguments) {
  // CSSKeywordValue {value: "orange"}
  // CSSUnitValue {value: 3, unit: "px", type: "length"}
  // CSSKeywordValue {value: "yellow"}
  // CSSUnitValue {value: 5, unit: "px", type: "length"}
  // CSSUnitValue {value: 1, unit: "px", type: "length"}
  console.log(arguments)
}
(CSSColorValue がまだ無いため、<color> が CSSKeywordValue になっている。#159)
例
例えば、その領域全体を、第一引数で渡ってきた色で塗りつぶす場合は、以下のように Canvas API で描画できる。
paint(ctx, {width: w, height: h}, styleMap, [color]) {
    ctx.strokeStyle = color
    ctx.fillRect(0, 0, w, h)
})
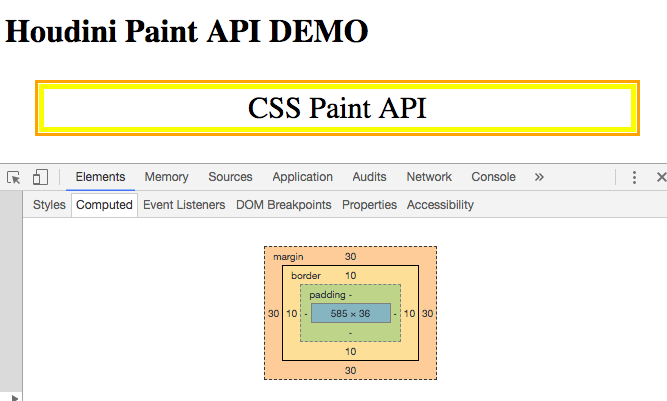
完成形
あとは、paint() の中で要求を満たす二つの矩形を描画する処理を記述すれば良い。
<style>
div {
  font-size: 30px;
  text-align: center;
  margin: 1em;
  padding: 0;

  /* fall back */
  border: double 4px red;

  /* debug option */
  --debug: false;

  /* area size for border */
  --border-width: 10;
  border-image-slice: var(--border-width);
  border-width: calc(var(--border-width) * 1px);

  /* paint(border-double-custom, outer-color, outer-width, inner-color, inner-width, margin) */
  border-image-source: paint(border-double-custom, orange, 3px, yellow, 5px, 1px);
}
</style>

<div>CSS Paint API</div>

<script>
CSS.registerProperty({
  name: '--debug',
  syntax: '<custom-ident>',
  inherits: true,
  initialValue: 'false',
});

CSS.paintWorklet.addModule('border-double-custom.js');
</script>
registerPaint('border-double-custom', class {
static get inputProperties() {
return [
'--debug',
]
}
static get inputArguments() {
return [
'<color>', // outer_color
'<length>', // outer_width
'<color>', // inner_color
'<length>', // inner_width
'<length>', // margin
]
}
paint(ctx, {width: w, height: h}, styleMap, args) {
console.log(ctx)
console.log(args)
const [
{value: outer_color},
{value: outer_width},
{value: inner_color},
{value: inner_width},
{value: margin}
] = args
console.log(outer_color, outer_width, inner_color, inner_width, margin)
// --debug
const DEBUG = styleMap.get('--debug').value == "true"
if (DEBUG) {
ctx.fillStyle = "cyan";
ctx.fillRect(0, 0, w, h);
}
// outer
this.rect(ctx, outer_color, outer_width, 0, 0, w, h)
// inner
let m = margin + outer_width
this.rect(ctx, inner_color, inner_width, m, m, w-(2*m), h-(2*m))
}
rect(ctx, color, l, x, y, w, h) {
ctx.strokeStyle = color
ctx.lineWidth = l
// shit inside for half of line width
ctx.strokeRect(x+(l/2), y+(l/2), w-l, h-l)
}
})動作イメージ

DEMO
動作するデモを以下に用意した。
Chrome 64 Canary で flag を有効にすると動作する。